The Tricky Hallway Finished!

8 Oct

We got the hallway finished up a few weeks back and I haven’t had time to share it here on the blog. I’m not sure if you all remember what we were dealing with before…

hallway before
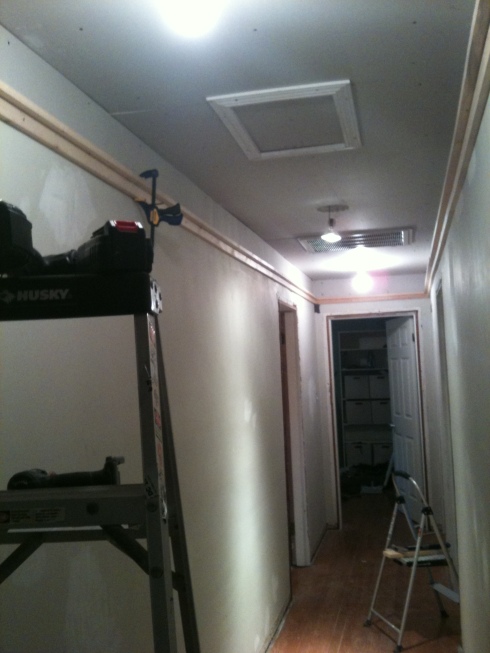
You can’t really see it in the photo but the ceiling had been dropped about a foot when Central Air had been originally installed way back when. It made for a very dark, dreary, and cramped space. I know it’s just a hallway but it really needed a little love. We took the ceiling down back in 2011 and while there has been drywall up top, the foot of space where the drop had been left quite a nice issue. IMG_1775I convinced Brian we should just trim the area out for the sake of being easy. You see… the drywall in this hallway isn’t 1/2 inch or 5/8ths inch drywall. It’s some crazy concoction of drywall + plaster that was going to cause a lot of issues if we just tried to finish it off with drywall. I knew we’d never get it even. Brian went along with it even though he was never really convinced.

IMG_1827I thought it would make a cool picture ledge or something. We lived with it for a while like this until one day Brian said… “I hate that trim in the hallway. It just doesn’t look right.” I had to agree with him. No real picture was ever really going to go up in that tiny space and it made the hall feel very very short even though we had opened up the ceiling. We had plenty of left over wood planks that we were originally going to use on the ceiling. Brian reminded me of this and after seeing how good it looked in the living room, I knew he was on the right track. So we spent a couple of short days putting up the planks, filling and sanding holes, priming, putting up crown, and finally painting. It turned out way better than I ever expected!

hallwaySorry for the poor iPhone photo. It’s really hard to get a shot of a hallway! You may notice we changed out the door trim. We had to because it was in really bad shape. We had some extra 1×4’s from when we tried to fix the ceiling in the living room with furring strips. We matched it to the same style we’ve put in the Living room and I love it! It really brings some cottage feel to this Rancher!

I’ve got a fireplace update on the way as well as a nursery plan! Expect several posts this week and next as we finish up some projects to make room and time for Baby Reagan!


Guess What?

2 Aug

I’ve got blue paint photos to share of the house but before I do, a little announcement. Drum roll please…

Baby Reagan Final SmallYep, we’ve got a little reinforcement on the way! That means that there are several projects that have to get done around here very very soon!

  • Fence for the back yard
  • Doggie door for the pups
  • An entire Nursery to decorate!
  • Not to mention finishing up the projects we already have started!

It’s a little overwhelming but we can do it!

Ready for a few house shots? I thought so. Without further comment, The Blue Monster!

Reagan Front Yard 2 Reagan Front Yard 3 Reagan Front Yard 1 Reagan Back Yard1 Reagan Back Yard 2 Reagan Back Yard 3I included just a few yard photos as well because the grass is just so pretty! We’ve still got a few spots of pink to paint over like on each of the doors but we’ve been waiting for some nice cool days we can leave the doors open and it’s just been too rainy and hot.

So there you have it. A baby and no more pink house!!!!

Pink No More… Well Almost

28 May

I’ve been holding out on you. Why? Well mostly because of the major pain in the you know what getting paint on this house has been. We hired a painter and he was a dud. I won’t go into great detail. Those of you who know us personally know the drama and I’m not rehashing it here. Needless to say, 8 weeks into the project there wasn’t a drip of paint on the house. So we fired him. AND we got to work. We’ve almost finished up all the prep-work. B & I are working hard to get that all done every night when he gets off work. That way we can spray on Friday, Saturday, & Sunday this weekend. We’ve got a little help from my Dad, sweet Cousin Tristan, and the Milwaukee Airless/Fine Finish Paint Sprayer  from Home Depot. Here’s how the house looks now all scraped, primed, and with a little paint on the front right side:

DSC_0118All of the big portions of primer you see on the siding had to be scraped to the bare wood. Basically the previous paint job was not done correctly and this paint was peeling off in sheets… with my hands. We used a few Harbor Freight $12 heat guns and putty knives to make the scraping go faster.  DSC_0119 DSC_0120There was quite a few pieces of the soffit and fascia that the painter replaced. We primed most of that bare wood and will be finishing up that before we paint. DSC_0121Most of the windows and doors are already taped off. We did that for the painter but he never got around to the painting part. We’ll have to tape up a few pieces that fell off and the few windows and doors that we left un-tapped.  DSC_0122 DSC_0123Notice something missing? That’s right the Hot Tub is GONE. Gave it away on Craigslist. I was so tired of it taking up our entertaining space and being an eyesore. I hope the new owners have it installed and are enjoying it!  DSC_0124 DSC_0125 DSC_0126 DSC_0127What what?! Is that paint!!!!??? Yes but this is paint that I tried to roll on… That brick was a no go! No rolling it. No way. Painting it with a brush was the only way… until we bought our little sprayer friend. Now, I know there will be some brushing paint in the brick. The sprayer is not the thing that saves that but it will make it easier and faster. Ignore that tiki torch. I was trying to keep the bugs away while painting last week. DSC_0128I love how the green of the plants works with the navy paint color. The color is Martha Stewart’s Wrought Iron. That color sounds like it would be black or dark charcoal but it’s not. It’s a dark navy.  DSC_0130Had to share this photo of our neighbors. I adore the houses on our street and their green green yards! DSC_0132Speaking of green yards… check out that rock free yard!  DSC_0140This is how happy B feels about our current painting project. Me too my love, mee too!

Easy Art DIY

22 Feb

In the last post I mentioned how that fresh coat of paint really had me reeling for some art for the spare bedroom. I wanted something fast, easy, and free. So I rememberd that I had some natural coffee filters laying around that didn’t work out on another project and we always have some spare wood in the tool room. All I needed to dig out was some glue. Since I was out of hot glue sticks and just grabbed up some Aleene’s® Original Tacky Glue. I knew it would take longer to set up but it would do just fine.

I simply put some glue on the MDF, spread thin so it would set up fast. I put my finger in the center of the filter and used the other hand to get the filter to fold up around my hand. I then pushed my finger into the glue on the MDF. I repeated this several times for each flower. Since I was using a glue that didn’t dry instantly, I only added about 5 filters at a time to each flower then moved on to another while I waited for the glue to set up. I think I used about 75-100 filters on the whole project and it only took me a total of maybe 2 hours.

DSC_0319 copy

DSC_0316Battenburg Love
Wondering how I hung it?

DSC_0303

First I ventured into the messiest tool room in the world…

DSC_0292I found these cool little brackets in this picture hanging kit we got from Harbor Freight ages ago…

DSC_0294

Then I realized they didn’t work the way I thought they did so I went back to the box… and pulled out my trusty picture wire.

DSC_0297I made a mark down the back of where I wanted the picture wire to run and pre-drilled two little holes for the screws.

DSC_0300I wrapped the wire around and around the loose screw, screwed it in trapping the wire, then wrapped the wire around itself several times, gave it several staples wrapping the wire through those as well, then banged the staples down with a hammer. I may have also added a few more staples just so I could hit it a few more times…. This is very scientific and I would only use this crazy rigging method on something that you hadn’t paid a lot for… You know, just in case it falls in the middle of the night…

DSC_0308We have crazy plaster on top of sheetrock walls in the original part of the house and if you don’t pre-drill holes in, you end up with a huge and cracked hole. So now, I pre-drill. My favorite way to hang things in our walls are these Hercules hooks or Monkey Hooks from Lowes. They hold a ton of weight and only add a small pin hole to the wall! They’ve got two different sized hooks. I like the small ones the best but this big guy was all I had on hand. I’ve used all the rest!

DSC_0313You just push it right into the hole and as long as you haven’t hit a stud, it’ll go right in and be ready to hang your frame/art/mirror or whatever. Just so you know how amazing these thing are, I’ve got three yes only three holding up our HEAVY pallet spice rack in the kitchen.

DSC_0323 DSC_0325

A while back we hung a chandelier that my Mom had in her Master Bedroom and was going to yard sale last Spring. I gave it a coat of red spray paint and Brian hung it up for me. I didn’t like the globes so I’ve got to find something to go over the bulbs. I have an idea but haven’t got the stuff on hand to try it out.

That’s all for now!

Adding Warmth With Paint

21 Feb

So we’ve finally gotten back to work on the house. This past weekend we primed the hallway trim, ceiling, and walls and I got busy painting over that yucky hello yellow I painted the spare room last summer. Not sure what I was thinking… I don’t event remember the paint color name because when we were cleaning out the tool room this past fall, I got rid of the can knowing I was going to repaint. I think it may have had something to do with a bird… It doesn’t really matter. I hated the color and it had to go.

Let’s stop and chat about creamy white for a moment. I will be the first to say that I DO NOT LIKE CREAM WALLS. I like gray/grey (depending on which side of the pond you are from), white, or anything with a blueish crisp undertone. But this room needed a bit of warmth. Not so much as in yellow but the way the light comes in the room felt cold. It was painted blinding white when we moved in and I think that cold feeling was what pushed me all the way to bright yellow. I needed a color that would brighten the space and warm it up.

We ended up going with Benjamin Moore Battenberg (AF-70).

BM Battenberg AF-70

It isn’t really that creamy. It’s more of an off white with subtle undertones that warm up the space.

DSC_0329This image really doesn’t do the color justice either. It’s just enough different from the trim work to make the trim pop. Every time I pass this room I smile. It’s become a good contender for the fireplace stucco paint color. I’ll have to place a few swatches to see if it has the same feel in that space.

So here’s how the space has transformed…

Move In Guest Room Hello Yellow Guest BedroomBattenburg LoveThis is a much better representation of the color!

This paint has inspired some creativity like that little piece of art above the night stand. Next post will be about how I made and hung it!